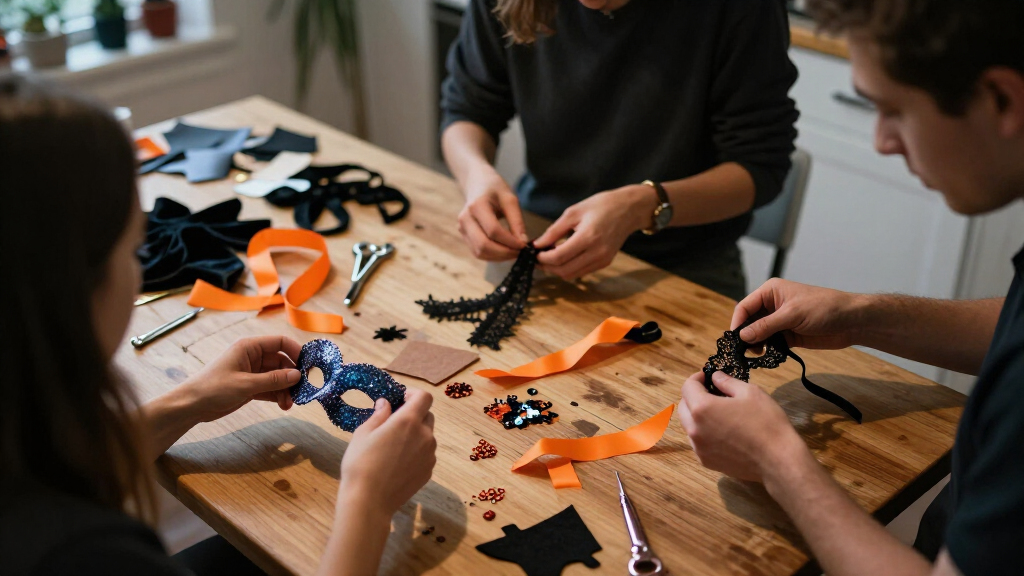
Choose and prepare accessories that make a Halloween costume recognizable, comfortable, and safe to wear. This guide is for beginners assembling a costume for a party, school event, or trick-or-treating. You will decide which details matter most, gather suitable materials, make or adapt accessories, and check the finished outfit before wearing it. Allow 1–3 hours for planning and hands-on work; shopping, paint drying, or glue curing may add time.

Get movie nights delivered free with Prime
- Fast, free delivery on millions of items
- Prime Video, Amazon Music and more included
- Member-only deals all year

Spooktacular Creations Vampire Bleeding Pearl Necklace
- ✔ Material: Plastic
- ✔ Pearl rows: 4
- ✔ Item width: 9.9 cm
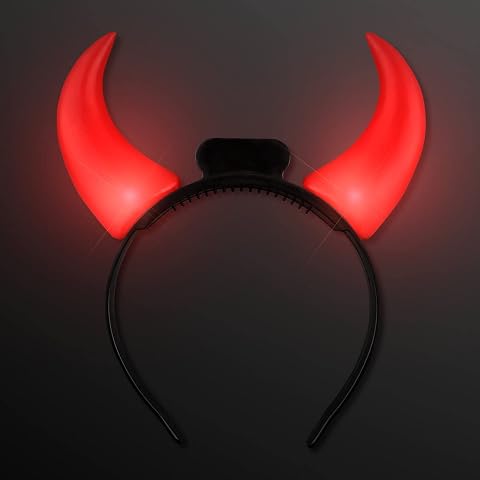
FlashingBlinkyLights Large Red Light-Up Devil Horn Headband
- ✔ Color: Red horns with black headband
- ✔ Lighting: Steady LED light
- ✔ Activation: Remove pull tab and flip switch

Fake Microphone Headset Costume Prop
- ✔ Materials: Plastic, iron, and PVC
- ✔ Color: Black
- ✔ Size: 5.1 x 5.9 in (13 x 15 cm)
Difficulty: Beginner | Time: 1–3 hours, plus shopping or drying time
What You’ll Need
Tools & Materials:
- Costume clothing or a clear costume idea
- Paper and pencil for a short accessory list
- Tape measure or ruler
- Scissors
- Needle and thread or fabric-safe adhesive, as appropriate
- Craft materials such as felt, cardboard, ribbon, elastic, or paint
- Mirror and a well-lit place to try on the costume
Knowledge:
- Basic measuring and cutting
- Ability to follow product labels for adhesives, paint, and small components
- For a child’s costume, an adult who can supervise fitting and craft work
Check the event’s rules before using masks, toy weapons, loose glitter, or battery-powered lights. Choose materials that can be worn safely for the full event. Keep sharp tools, hot glue, and small parts away from children unless an adult is supervising.
Spooktacular Creations Vampire Bleeding Pearl Necklace
This necklace earns our top spot because it changes the mood of several costumes with one distinctive detail. Its four rows of simulated pearls shift from white to blood red, with crimson beads hanging below to suggest dripping blood. Compared with the devil headband, it is a subtler accent rather than a source of light, but it also works across more character ideas: vampire, zombie, witch, or Victorian horror styling.The listed lightweight plastic construction makes it a costume-focused choice for extended wear, and the absence of a clasp means there is no small fastener to manage. That same no-clasp design may offer less flexibility in how it sits, and the necklace is not presented as fine jewelry. Buyers who want an accessory that reads clearly in photos or completes a darker outfit should find it more adaptable than the performance headset. Those seeking an illuminated statement or a polished everyday piece should look elsewhere.
Pros:
- Blood-red drip design gives Gothic and horror costumes an immediate focal detail.
- Four pearl rows create a fuller collar effect than a single strand.
- Lightweight construction is suited to wearing through an event.
- Can complement several costume themes rather than one character only.
Cons:
- Plastic construction keeps it firmly in costume-jewelry territory.
- No clasp may limit fit adjustment and ease of putting it on.
Best for: Halloween shoppers assembling vampire, witch, zombie, or Victorian-inspired outfits who want a lightweight, dramatic neck accessory.
Not ideal for: Buyers looking for metal jewelry, a clasp-adjustable fit, or an accessory that stands out through illumination.
Bottom line: We recommend this as the most flexible Halloween pick for shoppers who want one striking Gothic accessory to work across multiple horror looks.
“We recommend this as the most flexible Halloween pick for shoppers who want one striking Gothic accessory to work across multiple horror looks.”
FlashingBlinkyLights Large Red Light-Up Devil Horn Headband
When the costume needs to read at a glance, this headband has the clearest visual effect in the lineup. Its large red LED horns use a steady light, giving a basic devil outfit a more noticeable focal point than the necklace’s blood-drip detail. Activation is straightforward: remove the pull tab and use the switch. Replaceable batteries also make it possible to reuse the headband for another event, rather than treating it as a one-night-only prop.That visibility comes with a care tradeoff. The headband must be kept dry and can only be wiped clean, so it is less carefree than the plastic necklace for outdoor Halloween plans where weather is uncertain. Its one-size-fits-most fit is convenient, though it does not promise a tailored fit. Compared with the headset, it contributes more directly to a recognizable Halloween character; compared with the necklace, it is more theme-specific. Choose it for a devil costume or a bright accent, and skip it if you need something rain-tolerant or understated.
Pros:
- Large illuminated horns are easy to notice in low-light settings.
- Simple pull-tab and switch activation makes setup straightforward.
- Replaceable batteries support reuse across events.
- One-size-fits-most format avoids choosing among listed sizes.
Cons:
- Must be kept dry, limiting suitability for rainy or damp events.
- Wipe-clean-only care offers less flexibility than washable accessories.
Best for: Costume wearers who want a recognizable devil look and a bright accessory for evening parties or dim settings.
Not ideal for: People planning wet-weather outdoor events or looking for a subtle, non-electronic accessory.
Bottom line: We’d choose these horns over the necklace when visibility is the priority and the Halloween plan is reliably dry.
“We’d choose these horns over the necklace when visibility is the priority and the Halloween plan is reliably dry.”
Fake Microphone Headset Costume Prop
This headset serves a narrower role than the other two accessories: it helps define a singer, presenter, or stage performer rather than adding a general horror flourish. The adjustable plastic headband and bendable, rotatable microphone arm let the wearer position the prop for a character look, while its lightweight, compact build is convenient to carry or store. Compared with the necklace, it has less crossover into classic Halloween horror; compared with the illuminated horns, it is less attention-grabbing but more relevant to a performance-themed costume.We would treat it strictly as a visual prop. The microphone has no audio functions, so it will not help someone address a crowd or record sound. The listing also conflicts about whether the package contains one headset or two, which makes it harder to plan matching costumes. It is a reasonable choice for school plays, cosplay, or a pop-star outfit when the appearance is the goal. Buyers who need working equipment or certainty about receiving a pair should choose another option.
Pros:
- Adjustable headband is described as fitting most teens and adults.
- Bendable and rotatable microphone arm can be positioned for a character look.
- Lightweight, compact construction is easy to transport and store.
- Reusable for cosplay, school plays, parties, and performances.
Cons:
- Microphone is non-functional and has no audio features.
- Package quantity is inconsistent in the listing, with one- and two-piece details.
Best for: Teens and adults creating a singer, presenter, performer, or stage-character costume that needs a lightweight headset prop.
Not ideal for: Anyone who needs a functional microphone, a strongly horror-themed accessory, or a confirmed pair of headsets.
Bottom line: This is the right specialist prop for a performance costume, provided we only need the appearance and confirm package contents before relying on a pair.
“This is the right specialist prop for a performance costume, provided we only need the appearance and confirm package contents before relying on a pair.”
As an Amazon Associate we earn from qualifying purchases.
Before You Start
Write down the character or theme and identify the two or three details that make it easy to recognize. A pirate might need a bandana, an eye patch, and a belt; a wizard might need a hat and wand. Start with what you already own, then buy or make only the missing pieces. Try the clothing on before attaching anything, and leave enough time for paint or glue to dry according to its label.
Plan for the place and length of the event. A lightweight accessory that stays in place is usually more useful than a large prop that is hard to carry. Check sightlines, walking space, weather, and any rules at the venue. Avoid real weapons, sharp edges, choking hazards, and accessories that block breathing or hearing.
Step-by-Step Instructions
Step 1: Choose the costume’s key details
Write the costume name at the top of a page, then list the details people should notice first. Circle no more than three: for example, a cape, a crown, or a distinctive pair of ears. Sort the list into items you own, items you can borrow, and items you need to make or buy. This keeps the project focused and helps prevent a pile of extras from making the outfit uncomfortable.
Tip: If the costume is based on a character, use a reference image to check colors and shapes. You do not need to copy every small detail.
Check: You have a short list of accessories that clearly supports the costume idea.
Step 2: Set a budget and check the event rules
Set a spending limit before shopping. Check costume or venue rules for masks, props, lights, and materials. For a school event or group activity, ask the organizer if an accessory might be restricted. Choose an allowed alternative when needed, such as a soft foam prop instead of a hard replica or face paint instead of a full mask.
Tip: For trick-or-treating, pick accessories that leave hands free when possible. A small pouch or belt bag can carry essentials without requiring a large prop.
Check: Your accessory plan fits the budget and does not rely on an item the event prohibits.
Step 3: Gather materials and measure the wearer
Collect the clothing and accessories you plan to use. Measure the wearer where each item will sit: measure head circumference for a hat or headband, wrist or arm for cuffs, and waist for a belt or sash. Record each measurement on the project list. Gather suitable materials, fasteners, and tools before cutting, then test paint or adhesive on a scrap of the same material.
Tip: Leave a little adjustment room for elastic, straps, and clothing worn underneath. Do not make a tight accessory harder to remove than it needs to be.
Check: You have the needed supplies and measurements, with the attachment method chosen for each item.
Step 4: Make or adapt the accessories
Make the simplest high-impact item first. Cut fabric or paper pieces to the measured size, smooth or cover rough edges, and attach components with sewing, fabric adhesive, or another method suited to the materials. For a cardboard crown, wrap the band around the head to check the fit before joining the ends. For a wand or staff, choose a lightweight, blunt base and decorate it with paint or fabric. Let wet finishes dry fully before handling.
Tip: Keep adhesive away from skin and follow its label for ventilation and drying. Do not use a hot glue gun around children unless an adult is handling it.
Check: Each accessory is assembled, has no exposed sharp edges, and feels secure when gently handled.
Step 5: Attach and fit each item
Put on the costume clothing, then add accessories in the order they will be worn. Secure each piece with a comfortable strap, stitch, pin placed away from skin, or removable fastener suited to the garment. Ask the wearer to raise their arms, bend, sit, turn their head, and walk. Adjust anything that slides, pinches, catches on fabric, or limits movement.
Tip: Avoid fastening heavy decorations to thin fabric. Reinforce the area with a fabric patch or move the decoration to a sturdier seam.
Check: The accessories remain in place through ordinary movement and can be removed without struggle.
Step 6: Check visibility, comfort, and safety
Look at the full costume in a mirror from the front and sides. Confirm that hats, masks, hair pieces, and props do not block vision or breathing. Ask the wearer to listen for nearby voices, use stairs, and look at the ground. For nighttime events, add reflective details to clothing or a bag and use a light that does not create a trip hazard.
Tip: If a mask is uncomfortable or restricts sight, replace it with face paint, glasses, or a headpiece that leaves the face clear.
Check: The wearer can see, breathe, hear, walk, and move comfortably with the full costume on.
Step 7: Pack a small repair kit
Pack a few useful repair items in a small bag: safety pins, a short length of thread, spare elastic, tape suited to the costume material, and any needed batteries. Keep pins and small parts with an adult when a child is wearing the costume. Test kit items on a hidden area first if they could mark or damage the clothing.
Tip: Skip tools you cannot use safely at the event. A spare hair tie or simple clip can solve many loose accessory problems.
Check: You have a compact way to handle a loose strap or minor break without carrying bulky supplies.
Common Mistakes to Avoid
- Adding too many accessories until the costume is heavy or hard to move. — Prioritize the two or three details that communicate the character, then remove anything that catches, weighs down clothing, or occupies a hand unnecessarily.
- Attaching decorations before trying on the clothing. — Fit the garment first and mark attachment points while it is being worn over the intended layers. Remove it before sewing or gluing.
- Using a mask or headpiece that blocks sight or breathing. — Check visibility and comfort in bright light, then walk and turn the head. Choose a face-clear alternative if movement or breathing feels restricted.
- Wearing paint or glue before it has dried or cured. — Read the product label, allow its stated drying time, and test the finish before putting the accessory against skin or clothing.
Troubleshooting
Problem: A headband, hat, or crown keeps slipping.
Solution: Recheck the fit, add a soft adjustable elastic or discreet grip strip, and test it while turning the head. Keep any band comfortable and easy to remove.
Problem: An accessory pulls down thin clothing.
Solution: Move it to a seam or sturdier area, reduce its weight, or spread the load with a fabric backing. Avoid adding more glue to weak fabric.
Problem: Adhesive will not hold the decoration.
Solution: Check that the adhesive matches both materials, clean and dry the surfaces as directed, and let it cure for the full label time. Sew or use a suitable fastener if the materials are not compatible.
Problem: The costume looks unclear even with accessories.
Solution: Compare it with the reference image and add one recognizable color, shape, or prop. Remove details that compete with the main feature.
What Success Looks Like
The costume reads clearly as its intended character or theme, the accessories stay attached during ordinary movement, and the wearer can see, breathe, hear, and walk comfortably. Paint and adhesive are dry, sharp edges and loose hazards are absent, and any event rules have been checked. The wearer can put on and remove the accessories without pain or help beyond what is appropriate for their age.
Next Steps
Store reusable accessories in a labeled box or bag after the event. Remove batteries from lights before long-term storage, clean items according to their material, and repair loose seams before packing them away. Keep sharp craft tools and small parts stored safely. Before the next event, check elastic, closures, and battery condition, then repeat the fit and visibility checks.
Frequently Asked Questions
How many accessories should a Halloween costume have?
Start with two or three recognizable details. Add another only if it improves the costume without making it heavy, awkward, or harder to wear.
What can I use if I do not have time to make accessories?
Use items already at home, such as a scarf, belt, hat, safe costume jewelry, or a decorated paper sign. Check that borrowed items fit and do not have sharp or fragile parts.
How can I make a costume accessory safer for a child?
Choose lightweight, soft materials with blunt edges and secure fasteners. Keep small detachable parts, pins, and sharp tools away from young children, and supervise fitting and craft work.
Can I attach accessories with safety pins?
Use pins only where the point cannot touch skin, and close each pin fully. For active wear or thin fabric, sewing or a suitable fabric fastener may hold more reliably.
How do I keep accessories visible at night?
Add reflective tape or bright trim to clothing or a bag, and use a small light aimed toward the ground. Keep reflective material clear of the eyes and avoid dangling parts that can catch while walking.
Halloween Picks
halloween
As an affiliate, we earn on qualifying purchases.