
TL;DR
Moving your rig into a closet or separate room is the most effective way to reduce noise. Proper placement and ventilation are key, especially when placing a hot machine in a sealed space. Foam and blankets help inside but don’t replace soundproof barriers or ventilation solutions.
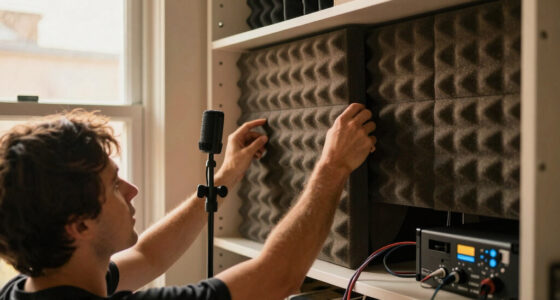
Ever wonder why your voice recordings sound dull or echoey, but your computer and its fans are loud enough to drown out your voice? The secret isn’t just more foam or foam at all. It’s about understanding where the noise comes from, how to place your gear, and how to manage heat and airflow.
If you’re trying to turn a tiny closet into a vocal booth or a quiet workspace, this guide walks you through what really works. No fluff, just proven tips to make your space sound better and stay cool — so your recordings and your machine stay happy.
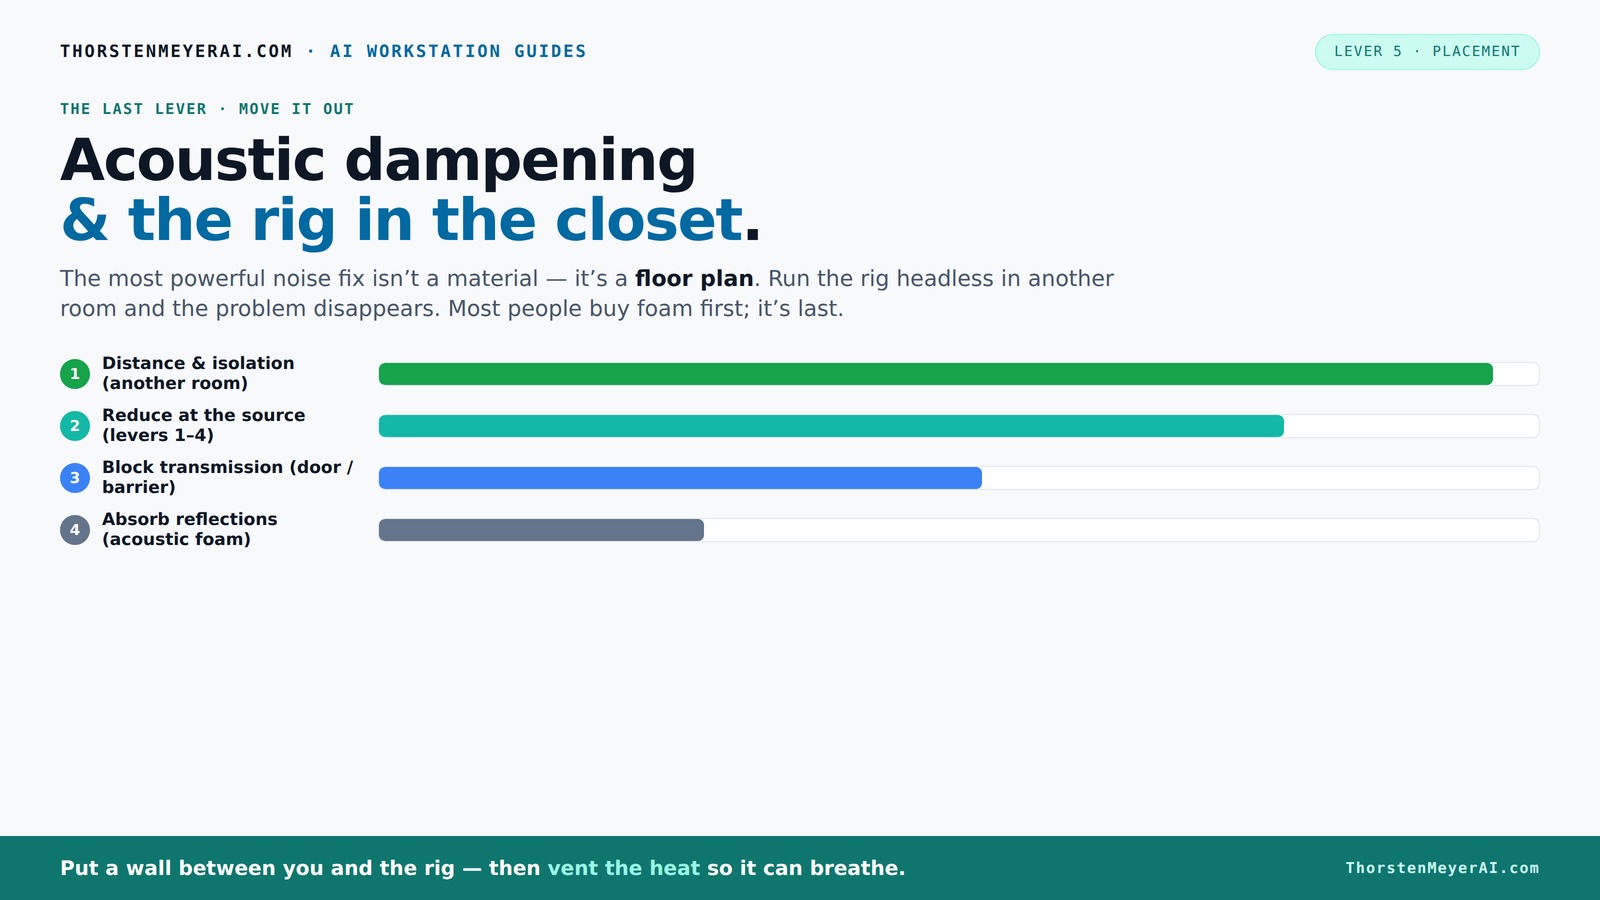
Acoustic dampening
& the rig in the closet.
The most powerful noise fix isn’t a material — it’s a floor plan. A rig you can’t hear because it’s in another room beats any amount of foam. Tap the approaches in Part 1 to see what actually works.
(another room)
(levers 1–4)
(door / barrier)
(acoustic foam)
Contain the noise, not the heat
Key Takeaways
- Moving your rig into another room or closet is the most effective way to reduce noise and heat issues. Proper ventilation is crucial when placing high-power equipment in enclosed spaces; passive vents and exhaust fans prevent overheating.
- Proper ventilation is crucial when placing high-power equipment in enclosed spaces; passive vents and exhaust fans prevent overheating.
- Placement of acoustic treatment at reflection points matters more than just covering every surface with foam.
- Foam and blankets help with echo and reflections but don’t block outside noise — sealing gaps and adding mass is essential for true soundproofing.
- Address low-frequency issues with corner bass traps or soft materials, especially in very small rooms.

Portable Recording Booth for Home Studio, Foldable Sound Isolation Vocal Shield with Floor Stand, High-Density Acoustic Blanket Enclosure for Singing, Voiceover & Podcast, Includes Phone Holder
INSTANT STUDIO-QUALITY "DRY" SOUND: Transform any noisy room into a professional vocal booth instantly. Engineered with high-density acoustic...
As an affiliate, we earn on qualifying purchases.
As an affiliate, we earn on qualifying purchases.
Why Moving Your Rig Is the Best Fix — And How to Do It Right
Distance beats treatment every time. When your rig is right next to you, even the best foam can't fully isolate the noise of fans, hard drives, or power supplies. Moving your equipment to another room or a separate closet reduces the direct noise path, making your workspace significantly quieter. This isn't just about comfort; it’s about acoustic clarity and preventing noise bleed into recordings.
However, relocating your rig isn't a passive solution. It requires ensuring a reliable connection—wired Ethernet or strong Wi-Fi—to maintain workflow. Additionally, consider how to keep the equipment cool; a distant location means you need proper ventilation to prevent overheating. The tradeoff is convenience versus noise reduction, but in most cases, the benefits of physical separation outweigh the hassle.
For example, I set up a small server in a closet across the hall. By SSH-ing into it, I avoid fan noise and heat buildup in my main workspace. This approach not only silences the hardware but also minimizes ambient noise, leading to clearer recordings and less post-production editing.

50 Pack Sound Proof Foam Panels for Walls, 2 X 12 X 12 Inches Acoustic Foam Panels, High Density Acoustic Panels Sound Absorbing, Noise Cancelling Studio Wedges, Black (NOT INCLUDE ADHESIVE)
PROFESSIONAL SOUND ABSORBING PROPERTIES – Our acoustic foam panels are expertly designed to reduce noise pollution by absorbing...
As an affiliate, we earn on qualifying purchases.
As an affiliate, we earn on qualifying purchases.
The ‘Rig in the Closet’ Setup — Ventilation and Heat Are Your Best Friends
Placing a high-power computer or audio interface in a sealed closet can seem ideal for noise reduction—no fans, no external sounds. Proper airflow is essential not just to keep equipment cool but also to maintain consistent performance. But the reality is that heat buildup becomes a serious concern. Overheating can cause hardware throttling, reduce lifespan, and even cause sudden shutdowns, which defeats the purpose of a quiet, enclosed space. Proper airflow is essential not just to keep equipment cool but also to maintain consistent performance.
Implementing active ventilation—such as installing a quiet exhaust fan, vents, or ducted airflow—is critical. These systems allow hot air to escape while bringing in cooler air, preventing thermal stress. Soundproofing measures like foam or acoustic panels can dampen noise from the ventilation system itself, but the primary goal is to ensure that heat doesn’t accumulate. For example, a 120mm quiet fan can keep a GPU from overheating in a closet if it has an escape route for hot air. The tradeoff involves balancing noise levels from the fan against the need for effective cooling. Proper placement of vents and choosing low-noise fans can optimize this balance. These systems allow hot air to escape while bringing in cooler air, preventing thermal stress. Soundproofing measures like foam or acoustic panels can dampen noise from the ventilation system itself, but the primary goal is to ensure that heat doesn’t accumulate. For example, a 120mm quiet fan can keep a GPU from overheating in a closet if it has an escape route for hot air. The tradeoff involves balancing noise levels from the fan against the need for effective cooling. Proper placement of vents and choosing low-noise fans can optimize this balance.
In essence, ventilation isn’t just about comfort; it’s about safeguarding your hardware’s longevity and maintaining consistent sound quality. Ignoring airflow can turn a peaceful, sealed space into a thermal disaster, so prioritize heat management as much as soundproofing.

TroyStudio Portable Sound Proof Box, 16" x 12" x 16.2" Noise Reduction Enclosure, Light Blocking Quiet Cover, Soundproof Barrier for Ultrasonic Cleaner, Air Pump, Rock Tumbler & Generator
【DIMENSIONS & COMPONENTS】: Exterior dimensions: 16"L x 12"W x 16.2"H; Interior space: 12"L x 8"W x 14.2"H; Foldable...
As an affiliate, we earn on qualifying purchases.
As an affiliate, we earn on qualifying purchases.
Acoustic Dampening vs. Soundproofing: What’s the Difference?
Acoustic dampening tools like foam, blankets, and rugs mainly reduce echoes and reflections inside your space. They work by absorbing sound waves, preventing them from bouncing around and creating a muddy or boomy recording. However, this internal treatment doesn’t address outside noise entering your space. It’s akin to softening the sound within a room but not blocking noise from outside. They work by absorbing sound waves, preventing them from bouncing around and creating a muddy or boomy recording. However, this internal treatment doesn’t address outside noise entering your space. It’s akin to softening the sound within a room but not blocking noise from outside.
Soundproofing, in contrast, involves making structural modifications—sealing gaps, adding mass, and decoupling surfaces—to prevent sound from leaking in or out. Think of foam as softening or scattering sound waves inside; soundproofing is about creating a barrier that resists sound transmission. For example, adding mass with a dense door or sealing gaps with weather stripping prevents external noise from intruding, which is essential if your environment is noisy. Think of foam as softening or scattering sound waves inside; soundproofing is about creating a barrier that resists sound transmission. For example, adding mass with a dense door or sealing gaps with weather stripping prevents external noise from intruding, which is essential if your environment is noisy.
The tradeoff is that true soundproofing is more invasive and expensive, but necessary when external noise is a significant problem. Use dampening inside to improve clarity and reduce echo, but recognize that sealing gaps and adding mass are what really block outside sounds. Combining these approaches yields the best results: internal dampening for clarity, structural soundproofing for noise isolation.
ventilation solutions for enclosed recording space
As an affiliate, we earn on qualifying purchases.
As an affiliate, we earn on qualifying purchases.
Placement Tips: Where to Put Your Absorbers for Best Results
Placement matters far more than the quantity of foam you use. Identifying reflection points—surfaces where sound waves bounce directly into your microphone—is key. For tips on how to find these points, check out placement tips to optimize your acoustic treatment. These are typically the wall behind your mic, the ceiling above, and the wall directly in front of you. Treating these points prevents problematic echoes and ensures your recordings are clear and natural-sounding.
To find reflection points, a common method is the mirror trick: have someone move a mirror along your walls while you sit at your desk. When you see the microphone in the mirror, that’s a reflection point worth treating. This targeted approach ensures you’re not wasting foam on areas that don’t significantly impact sound quality. Proper placement of absorbers at these points reduces flutter echoes and standing waves, which can cause a metallic or boxy sound. It’s a strategic process that maximizes the effectiveness of your treatment without unnecessary clutter.
Corner Bass Traps and Soft Surfaces — Do You Need Them?
In small, enclosed spaces like closets, low-frequency buildup can cause a boomy, boxy sound—a common problem in tight rooms. Bass traps—thick panels made of foam or mineral wool—are designed to absorb these deep sound waves, especially in the corners where bass frequencies tend to accumulate. Proper bass trapping can significantly improve clarity and reduce muddiness, making voices sound more natural and full.
However, in many small closet setups, voice recordings don’t require full bass trapping unless you notice pronounced low-end resonance or muddiness. Instead, focusing on broad surface treatment—like adding soft materials such as rugs, curtains, or blankets—can effectively tame low-frequency issues. These materials absorb a range of frequencies and help diffuse standing waves, providing a balanced sound. For example, a thick rug and a blanket over the door can soften the overall sound, reducing harshness and muddiness without the complexity or expense of dedicated bass traps.
In essence, you should consider bass traps if you identify consistent low-frequency problems. Otherwise, simpler soft surface treatments can achieve a balanced, natural sound in a small space.
Troubleshooting Common Closet Sound Issues
When your recordings sound boxy, dead, or boomy, it’s often due to parallel walls reflecting sound back and forth, creating standing waves. Insufficient broadband absorption allows these reflections to persist, muddying your recordings. To fix this, add absorption panels on walls, ceiling, and door to break up these standing waves. Experiment with placement to target specific problem frequencies.
If your voice sounds muffled, it could be a sign that sound is being trapped or overly absorbed. Try opening a small vent or adding a diffusive surface—like a slatted panel—to reflect some sound back into the space, restoring clarity. Flutter echoes—rapid repetitions of sound—occur when sound bounces between parallel surfaces. To break this loop, hang softer materials such as thick blankets or quilts on one side, which diffuse and absorb the reflections, resulting in a more natural sound.
For example, I used a combination of foam panels and a hanging quilt, strategically placed to target my echo issues. The difference was night and day, with clearer voice recordings and more balanced acoustics. The key is understanding the specific problem—whether it’s reflections, low-end buildup, or muffling—and applying targeted solutions.
Sample Closet Setup: Budget, Mid-Range, and Portable Solutions
Here are three practical setups:
- Budget: Use a few foam panels strategically placed at reflection points, a door draft seal, and a thick blanket draped over the door to absorb reflections and reduce noise. Ventilation can be a small fan or simply an open window. This setup balances cost and effectiveness for basic needs.
- Mid-range: Incorporate corner bass traps to manage low frequencies, add a foam ceiling panel to control flutter echoes, and include a portable ventilation fan to keep airflow steady. Seal gaps with weather stripping or door seals for improved sound isolation. This provides a more balanced acoustic environment suitable for serious work.
- Portable rig: Use a foldable closet or wardrobe lined with foam panels, paired with a small, quiet fan and a portable microphone stand. This is ideal for moving between different spaces without sacrificing much sound quality. Proper placement of treatment materials on reflection points and ensuring ventilation are key to maximizing performance.
Each setup’s success hinges on understanding your space’s unique acoustic challenges and addressing reflection points and heat management accordingly.
Frequently Asked Questions
How much treatment do I really need for a closet vocal booth?
Start with reflection points: behind your mic, ceiling, and the wall facing you. Add soft materials like blankets or foam. Bass traps are optional unless you notice muddiness. Over-treating can deaden your sound, so focus on key reflection areas.Should I treat the door or the walls first?
Prioritize the door, especially if it’s hollow or gaps are visible. Sealing it with weather stripping or a blanket reduces outside noise and echo. Then treat the main reflection points on the walls for clarity.Can foam or blankets truly soundproof my closet?
No, they mainly reduce echoes and reflections. To block outside noise, you need sealing, mass, and sometimes decoupling. Foam and blankets help your voice sound better but won't make a closet soundproof in the strict sense.How do I prevent heat buildup when placing a rig in a closet?
Use vents, exhaust fans, or ducting to move hot air out. Avoid sealing the space completely. Consider an active cooling solution like an AIO liquid cooler that expels heat outside the closet for long sessions.What’s the best way to handle low-end muddiness in a tiny closet?
Add corner bass traps or thicker acoustic panels. Use rugs, curtains, or blankets to soften reflections. Focus on broad surface coverage to tame standing waves and low-frequency build-up.Conclusion
Trying to tame noise in a closet isn’t about stuffing it with foam. It’s about smart placement, ventilation, and sealing gaps. When you keep your rig cool and your reflections controlled, your recordings sound clearer, and your hardware stays happy.
Next time you set up a closet studio, remember: move it away first, treat reflection points, ventilate properly, and don’t be afraid to layer your solutions. A quiet, good-sounding space is within reach — sometimes, all it takes is a little strategic thinking and a couple of blankets.